Introduction
Deploy Secure ASF Applications with CloudBoost Library.
Actions:
- Create and import the certificates
- Register SF Application in AAD and create AppKey
- Generate Encrypted AppKey.
- Lookup the Service Principle of AAD Group & Azure Key Vault
- Create the Key Vaults with ARM
- Adjust the SF Application settings
- Upload certificate to Key Vault
- Register the Service Fabric System Applications
- Install SF Cluster with ARM
- Install the SF Application(s) with ARM
Related Azure Resources
| Resource | Description | Automation |
|---|---|---|
| KeyVault | Creates a key vault for the storage of secrets, keys and certificates | ARM |
| KeyVault update secret | Update or add a secret to an existing Azure KeyVault. Used during release when a resource is created which exposes a secret. | ARM |
| KeyVault | Creates a key vault for the storage of secrets, keys and certificates | Bicep |
Create and import the certificates
Step 01: Create self-signed certificates and Importing certificates in your certificate store on your local computer We need 2 certificates:
- SF Cluster certificate which is necessary to access the Explorer site of Service Fabric;
- Data Encipherment certificate which is necessary to encrypt de AppKey of the applications.
For non-production environments, it is possible to use self-signed certificates. For production, it is highly recommended to use certificates trusted by root authority.
The first certificate must meet the following requirements:
- The certificate must contain a private key.
- The certificate must be created for key exchange, which is exportable to a Personal Information Exchange (.pfx) file. For the The certificate’s subject name must match the domain that you use to access the Service Fabric cluster. This matching is required to provide an SSL for * the cluster’s HTTPS management endpoints and Service Fabric Explorer.
Create self signed certificates:
Open Powershell and run the next command:
New-SelfSignedCertificate -certstorelocation cert:\localmachine\my -dnsname "<dnsname>.westeurope.cloudapp.azure.com" -NotAfter (Get-Date).AddMonths(60)'. This certificate is valid for 5 years (60 months). replace <dnsname> with your own dnsname, this must be the name you are going to use for the secure Service Fabric Cluster.

The result shows the thumbprint, which we need to export the certificate.
Run the command:
Export-PfxCertificate -cert cert:\localMachine\my\C7E29EDAA6E967D51EDFF257BEF9B5D6DD207DF9 -FilePath D:\temp\Blog\ASFExplorer.pfx -Password (ConvertTo-SecureString -String "TodayIsMondayNovember" -Force -AsPlainText).
At FilePath enter your own path where you want to store the certificate. At Password enter of course your own password.

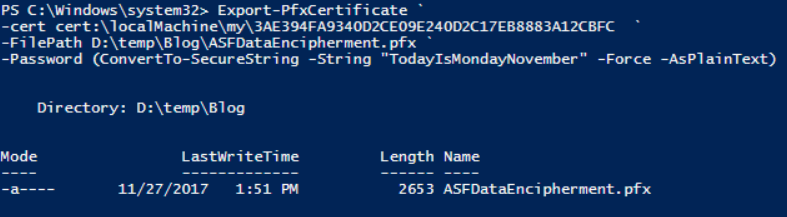
The same we do for a certificate we use for encrypt the later use AppKey of the application we are installing on our Secure Service Fabric Cluster. The name of Dnsname doesn’t really matter, but pick a meaningful name. Run command:
New-SelfSignedCertificate -certstorelocation cert:\localmachine\my -dnsname "DataEncipherment"

Run command:
Export-PfxCertificate -cert cert:\localMachine\my\3AE394FA9340D2CE09E240D2C17EB8883A12CBFC -FilePath D:\temp\Blog\ASFDataEncipherment.pfx -Password (ConvertTo-SecureString -String "TodayIsMondayNovember" -Force -AsPlainText)
At FilePath enter your own path where you want to store the certificate. At Password enter of course your own password.
Goto to the location of DataEncipherment certificate, in mine case D:\temp\Blog\ASFDataEncipherment.pfx , double click on it. And select Current User, enter the password in mine case ‘TodayIsMondayNovember’ and accept the default settings. And do the same for the other certificate, otherwise you will not be able to see the Explorer site of the Service Fabric Cluster.
Remember/Write down both thumbprints of the certificates, you need them later.
The certificates are in the certificate store on our computer and we do have copies which we can later upload to Azure KeyVault.
Register SF Application in AAD and create AppKey.
In the Azure portal, it is necessary to register the Service Fabric applications (e.g. Web API’s). When an application is registered, it has an ApplicationId and a ServicePrinciple ObjectID, you need these IDs later in one of the following steps.
Azure Portal:
- Open your browser and go to http://portal.azure.com
- Go to Azure Active Directory.
- Go to App Registrations.
- Add Application:
- Click on “New application registration”
- Sign-On URL don’t have to be an existing URL. A valid Uri will do.
- Click CREATE. After creation, you can see the ApplicationId in the overview/properties blade.
- Create AppKey. It is also necessary to create an AppKey for the application, this can be done by clicking on KEYS in the settings blade of the application.
- Fill in a keyname
- After the key is saved the key is temporally visible. So write it down and remember.
- Lookup Service Principle of the created application.
- Start Powershell and execute:Login-AzureRmAccount.
- Login with the same credentials, you use for http://portal.azure.com.
- When you are not in the correct subscription, then you have to select the correct subscription. Run command:
Get-AzureRmSubscription. You will see an overview of all the subscriptions which are connected to your login. - Select the correct subscription with the command:
Select-AzureRmSubscription -SubscriptionName name of subscription. Now you are switched to the correct Azure subscription. If you want to verify if you are in the correct subscription you can run command Get-AzureRmContext. - Run command:
Get-AzureRMADServicePrincipal -SearchString your_app
- Repeat this for all applications. “Add Application”, “Create AppKey” & Lookup Service Principle of the create application for all Service Fabric Applications you made.
Generate Encrypted AppKey
In this step we generate encrypted value of the appkey, we generated in the previous step. For the generation of the encrypted value, one of the certificates we created in the first step will be used. The encrypted value will be used later on in the CI/CD pipeline.
For every SF application which is created in the previous step you have created an AppKey. This AppKey needs to be encrypted and will be an input parameter for the Release task in Visual Studio Team Services (VSTS).
To make encryption possible it is necessary that you have imported the Data Encipherment certificate. Lookup the thumbprint of the Data Encipherment certificate, you can do that by opening MMC and then add snapin ‘Certificates’ and choose Computer Account, find the certificate and double click.

Double click on Thumbprint. In the bottom screen copy the text. Remember/Write down the Thumbprint.
When you have not installed the Service Fabric Powershell modules, please do so, see https://docs.microsoft.com/en-us/powershell/azure/service-fabric/overview?view=azureservicefabricps Open powershell and execute the following command:
Invoke-ServiceFabricEncryptText -CertStore -CertThumbprint '<THUMBPRINT>' -Text '<APPKEY>' -StoreLocation CurrentUser -StoreName My
Watch the single quotes instead of the double quotes. The result of the command will look like:

Copy the result of the command and paste it in notepad and remove the CRLF, so that it will become a one line string and remember it. Repeat this for every application you have created in AAD.
Lookup the Service Principle of AAD Group & Azure Key Vault
Key Vault Service Principle. Get-AzureRMADServicePrincipal -SearchString 'Azure Key'.
step04_005.png
AAD Group Service Principle. Get-AzureRmADGroup -SearchString '<Name of the group>'
Create the Key Vaults with ARM
Connect with the CloudBoost Library GIT Repo. Create Build in Azure DevOps to get the Azure Key Vault ARM templates.
We will create two key vaults. One which holds the certificates the other holds the app secrets.
The certificates is used for deployment and should be in the Team DevOps Resource Group -enabledForDeployment true -enabledForTemplateDeployment true -enableVaultForVolumeEncryption false (a resource group which holds DevOps artifacts for the team), the other one should be in the Core Resource Group next to the ASF Cluster.
Add the saved secrets to the KeyVault.
!Todo: verify
Adjust the SF Application settings
In this step we prepare the settings of a SF Application. The Application is registered in AAD, this way we can control which application is allowed or not to access another application. To make this possible the AppId and AppKey of the calling application is needed. With this combination we authenticate to the other application we are calling. Besides the information we also need some AAD information, such as AAD-Instance, TenantId & AAD-Uri, these are stored in the Key Vault Application Secrets, previous step.
- ADD settings in the config of the SF Applications. extract variables from the KeyVault you have to know the address of the Key Vault.
- Add Application Parameter file to project.
- Go to the service fabric project and open one of the XML files. I assume you know the meanings of the different ApplicationParameters XML files.
- Earlier you have written the encrypted appkey down. Use that value in application parameter file. We also need to put the thumbprint of the certificate in this file.
Upload certificate to Key Vault
As mentioned in the pre-requirements you must have 2 certificates. These certificates must be upload to Key Vault InstallCert, so it can be used by the installation of the Service Fabric Cluster.
Upload Data Encipherment certificate with the following powershell command:
Import-AzureKeyVaultCertificate -VaultName '<vaultname of InstallCert>' -Name 'dataenciphermentcert' -FilePath '<D:\temp\Blog\ASFDataEncipherment.pfx' -Password (ConvertTo-SecureString -String '<Password you set when creating certificate>' -AsPlainText -Force)
Adjust the following values:
- VaultName: The name of your Key Vault for Installing Certificates (see step 05)
- FilePath: To the location of your data EnciPherment certificate (see step 01)
- Password: The password you used to create the certificate, (see step 01)
- Name: Name of the certificate in the KeyVault, must be equal to the value in ApplicationParameters of your SF Application (see end of step 06)
!Note: Be sure to set the right subscription!
Upload SFCluster Certificate with the following powershell command:
Import-AzureKeyVaultCertificate -VaultName '<vaultname>' -Name '<Name of certificate>' -FilePath 'D:\temp\Blog\ASFExplorer.pfx' -Password (ConvertTo-SecureString -String '<Password you set when creating certificate>' -AsPlainText -Force)
Adjust the following values:
- VaultName: The name of your Key Vault for Installing Certificates (see step 05)
- FilePath: To the location of your SF Explorer certificate (see step 01)
- Password: The password you used to create the certificate, (see step 01)
- Name: Name (any name you want) of the certificate in the KeyVault.
!Note: Be sure to set the right subscription!
Look up Secret Identifier of the uploaded certificates
- Go to Azure Portal and to the Resource Group of the Key Vaults.
- Click on the Key Vault Install Cert
- Click on the first uploaded certificate
- Click on Current Version
- Remember/Write down the value in Secret Identifier.
step07_001-563x350.png
Lookup Resource Id of the Key Vault:
- Go to the main screen of the Key Vault
- Click on Properties
- Remember/Write down the value in RESOURCE ID.
Register the Service Fabric System Applications
In this step we register the system applications of Azure Service Fabric. We are doing this with aid of a powershell script I found here http://servicefabricsdkstorage.blob.core.windows.net/publicrelease/MicrosoftAzureServiceFabric-AADHelpers.zip.
Register Service Fabric System Applications clustername_Cluster & _Client.
Before you are start this task, you have to know how you are going to name your Service Fabric Cluster. You already know this, because in step 01 when creating the certificate you supplied dns name for the SFExplorer certificate. This information is also necessary for step Step 09: Setup Service Fabric Cluster.
Run powershell script
- Extract the content of the ZIP file.
- Open Powershell. CD to the location where you extracted the ZIP file.
- Run command:
.\SetupApplications.ps1 -TenantId '<your AAD tenantId>' `
-ClusterName '<name of your cluster>' `
-WebApplicationReplyUrl 'https://<name of your cluster>.westeurope.cloudapp.azure.com:19080/Explore/index.html'
Remember/Write down the value a WebAppId (is Application
Set Roles
Go to the WebApp (=is Application
And click “users and groups” here you can add users and assign a role to them “ReadOnly” or “Admin”. Here you manage who has access to SF Explorer.
Install SF Cluster with ARM
ARM Template to create the Secure Service Fabric Cluster can be found in the Library.
Create Release task in VSTS with the override parameters values from the previous steps:
-clusterName $(clusterName) -subnet0Name "Subnet-0" -subnet0Prefix "10.0.0.0/24" -publicIPAddressType "Dynamic" -vmStorageAccountContainerName "vhds" -adminUserName $(adminUserName) -adminPassword $(adminPassword) -addressPrefix "10.0.0.0/16" -overProvision "false" -vmImagePublisher "MicrosoftWindowsServer" -vmImageOffer "WindowsServer" -vmImageSku "2016-Datacenter" -vmImageVersion "latest" -loadBalancedAppPort1 49255 -loadBalancedAppPort2 49256 -clusterProtectionLevel "EncryptAndSign" -certificateStoreValue "My" -certificateThumbprint $(certificateThumbprint) -sourceVaultValue $(ResourceIdVaultValue) -certificateUrlValue $(certificateUrlValue) -certificateDataEncryptionUrlValue $(certificateDataEncryptionUrlValue) -datacertificateThumbprint $(datacertificateThumbprint) -storageAccountType "Standard_LRS" -supportLogStorageAccountType "Standard_LRS" -applicationDiagnosticsStorageAccountType "Standard_LRS" -nt0InstanceCount $(nt0InstanceCount) -vmNodeType0Name "standard" -vmNodeType0Size $(vmNodeType0Size) -applicationInsightsKey $(appInsightsKey) -aadClusterApplicationId $(aadClusterApplicationId) -aadClientApplicationId $(aadClientApplicationId)
sourceVaultValue: see end of step 7
certificateUrlValue: see step 7
certificateDataEncryptionUrlValue see step 7
datacertificateThumbprint See step 3
certificateThumbprint see step 3
aadClusterApplicatioId see end of step 8
aadClientApplicationid see end of step 8
appInsightsKey When you appInsights installed then fill in the iKey of the Application Insight instance. Leave empty if you don’t have one.
adminUserName / adminPassword Username / admin. With this combination you are able to RDP to the virtual machine on which Service Fabric is running. Password must meet some requirements, make sure there is a number and symbol (like !, %, ?)
clusterName Name of the cluster. Must be the same as what you used in the previous step “Step 08: Register Service Fabric System Applications
Set the Azure subscription and Resource Group for every ARM task See paragraph “Set the Azure subscription and Resource Group for every ARM task” in step 5.
Install the SF Application(s) with ARM
to execute this step for every SF Application (API). Not only the Application is add to SF Cluster