Back to Infrastructure as Code index <–
Catalog of predefined CloudEndure Best Practices and Templates
Setup Disaster Recovery using Cloud Endure
Process Document
1. Introduction
IT disasters such as data canter failures, server corruptions, or cyber-attacks can not only disrupt your business, but also cause data loss, impact your revenue, and damage your reputation. Cloud Endure Disaster Recovery minimizes downtime and data loss by providing fast, reliable recovery of physical, virtual, and cloud-based servers into AWS.
You can use Cloud Endure Disaster Recovery to protect your most critical databases, including Oracle, MySQL, and SQL Server, as well as enterprise applications such as SAP.
Cloud Endure Disaster Recovery continuously replicates your machines (including operating system, system state configuration, databases, applications, and files) into a low-cost staging area in your target AWS account and preferred Region. In the case of a disaster, you can instruct Cloud Endure Disaster Recovery to automatically launch thousands of your machines in their fully provisioned state in minutes.
By replicating your machines into a low-cost staging area while still being able to launch fully provisioned machines within minutes, Cloud Endure Disaster Recovery can significantly reduce the cost of your disaster recovery infrastructure.
2. Benefits of CloudEndure Disaster Recovery
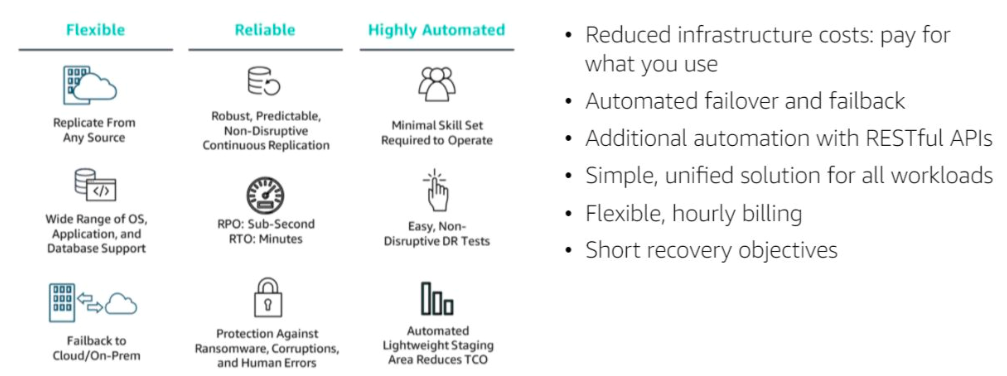
- Significant reduction in total cost of ownership (TCO) compared to traditional disaster recovery solutions
- Sub-second Recovery Point Objectives (RPOs)
- Recovery Time Objectives (RTOs) of minutes
- Support for any source infrastructure and any workload, including critical databases such as Microsoft SQL Server, Oracle, and MySQL, and enterprise applications such as SAP
- Automated failover to target AWS Region during a disaster
- Point-in-time recovery, enabling failover to earlier versions of replicated servers in cases of data corruption, ransom ware, or other malicious attack
- one-click failback, restoring operations to source servers automatically Î Unlimited, non-disruptive disaster recovery drills
3. Cloud Endure Disaster Recovery
3.1 SAML Single Sign-On
CloudEndure allows you to sign into the CloudEndure User Console using your corporate credentials through our SAML integration (SSO).
In order to use SAML to sign into the CloudEndure User Console, you must first configure Single Sign-On SAML Authentication.
The following instructions illustrate how to configure Single Sign-On SAML Authentication through the Microsoft Active Directory Federated Services (ADFS).
3.1.1 Single Sign-On SAML Authentication through ADFS
- In the Server Manager, click Tools, and then select AD FS Management.
- Under Actions, click Add Relying Party Trust.
- On the Welcome page, choose Claims aware and click Start.
- On the Select Data Source page, click Enter data about the relying party manually and then click Next.
- On the Specify Display Name page, type a name in a Display name. Under Notes, type a description for this relying party trust and then click Next.
- On the Configure Certificate page, click Next.
- On the Configure URL page:
- Select the Enable support for the SAML 2.0 WebSSO protocol check box.
- Under Relying party SAML 2.0 SSO service URL, type the Security Assertion Mark-up Language (SAML) service endpoint URL for this relying party trust - https://console.cloudendure.com/api/v5/assertionConsumerService
Note: Alternatively, try https://console.cloudendure.com/api/v4/assertionConsumerService
-
Click Next.
- On the Configure Identifiers page, specify https://console.cloudendure.com as an identifier for this relying party, click Add to add it to the list, and then click Next.
-
On the Choose Access Control Policy page, select a policy and click Next. For more information about Access Control Policies, see Access Control Policies in AD FS. - On the Ready to Add Trust page, review the settings, and then click Next to save your relying party trust information.
- On the Finish page, click Close. This action will automatically display the Edit Claim Rules dialog box.
Note: The Edit Claim Rules dialog box can be opened later from the AD FS management console (select the new Relying Party Trust and click on Edit Claim Rules under Actions.)
In the Edit Claim Issuance Policy dialog box, navigate to Issuance Transform Rules and click Add Rule.
- On the Select Rule Template page, under Claim rule template, select Send LDAP Attributes as Claims from the list, and then click Next.
- On the Configure Rule page:
- Type the display name for this rule in the field under Claim rule name.
- Select the appropriate Attribute Store from the dropdown menu.
- Select the LDAP attribute and map it to the outgoing claim type:
- LDAP Attribute: User-Principal-Name
- Click Finish
- In the Edit Claim Rules dialog box, click OK to save the rule.
3.1.2 Enabling RelayState in ADFS
RelayState is a parameter of the SAML protocol that is used to identify the specific resource the user will access after they are signed in and directed to the relying party’s federation server.
Note: Certain identity management providers, such as OKTA, require users to set the relayState value manually. Input the following value: https://console.cloudendure.com/#/signIn;
For ADFS 2.0, you must install update KB2681584 (Update Rollup 2) or KB2790338 (Update Rollup 3) to provide RelayState support.
- Use the following steps to enable the RelayState parameter on your AD FS servers:
- Open the following file in Notepad: %systemroot%\inetpub\adfs\ls\web.config
- Run IISReset to restart IIS.
- Restart the Active Directory Federation Services (adfssrv) service.
- In the microsoft.identityServer.web section, add a line for useRelayStateForIdpInitiatedSignOn as follows, and save the change:
3.1.3 Configuring SAML in the CloudEndure Console with AD FS
- Before SSO can be used, you will need to set up the following parameters within the CloudEndure Console. You can obtain these parameters by following these directions:
- Identity Provider ID
- Download this file in the browser: https://<adfs_domain>/FederationMetadata/2007-06/FederationMetadata.xml
- You can locate the Identity Provider ID in entityID, an attribute of
, the ID should be in the second line of the XML file (by default http://<adfs\_domain>/adfs/services/trust).
- Identity Provider Certificate
- Browse within the file you downloaded in Step a: https://<adfs_domain>/FederationMetadata/2007-06/FederationMetadata.xml
- You can locate the Identity Provider Certificate under:
/ <KeyDescriptor use=”signing”>/ / /
- Identity Provider URL
- Navigate to Service > Endpoints in the ADFS console in the tree view on the right.
- Find the Endpoint of the Type SAML 2.0/WS-Federation (by default /adfs/ls/)
- Add http://<adfs_domain> to it to get the Identity Provider URL.
- Identity Provider ID
- Sign into the CloudEndure User Console.
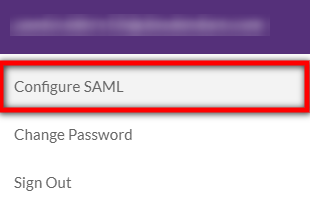
- Click on the User Settings icon
 on the top-right hand side of the User Console. .
 - Select Configure SAML.
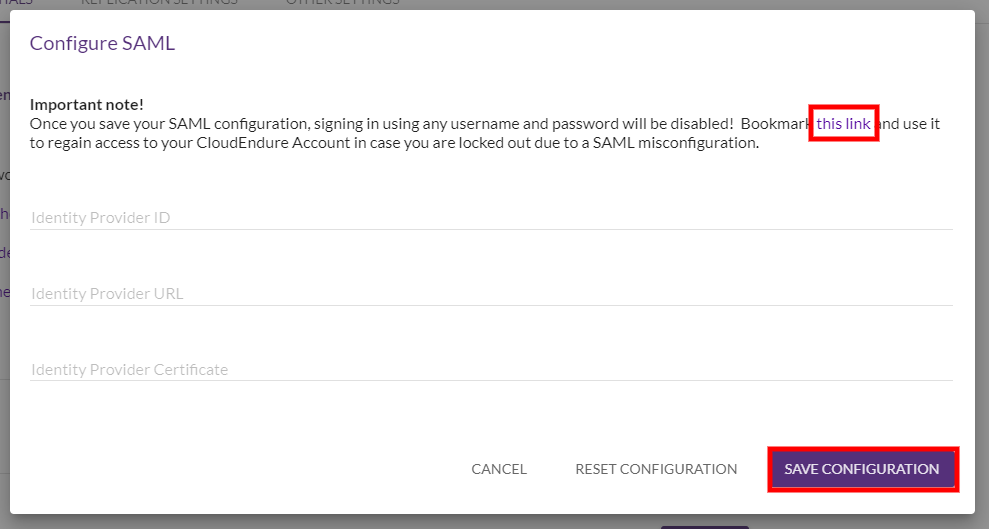
- In the Configure SAML dialog, do the following:
- Bookmark the rescue link found in the “Bookmark this link and use it to regain access…” text.
- Enter your account details, including your Identity Provider ID, Identity Provider URL, and Identity Provider Certificate.
- Click SAVE CONFIGURATION.
- Click on the User Settings icon
-
You can rest the SAML configuration by clicking REST CONFIGURATION. Note that resetting SAML settings is likely to prevent other users from being able to log into the CloudEndure Account.
Click YES on the warning dialog to confirm the reset.
3.2 Signing into the CloudEndure User Console Using Corporate Credentials
Once SAML integration is configured, you can sign in to the CloudEndure User Console either through the CloudEndure User Console Sign In page or through a direct login link.
3.2.1 Manual Sign In
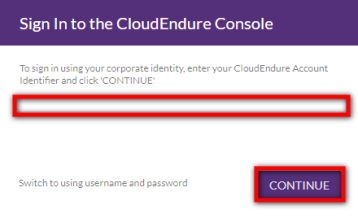
- Navigate to the CloudEndure User Console Sign In page.
- Click on Use corporate credentials (SSO) on the bottom.
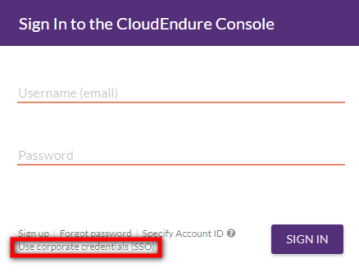
- Enter your CloudEndure Account Identifier to sign in and click CONTINUE. The Account Identifier is a unique identified allocated to your Account by CloudEndure. You can obtain your Account Identifier as explained in this FAQ item.
- You will be automatically redirected to the login screen of your Identity Provider. Follow the login operations using your organizational credentials. Once logged in, you will be automatically redirect directly into the CloudEndure User Console as a signed in user.
3.2.2 Automatic Sign in using a Direct Link
Alternatively, you can navigate directly to https://console.cloudendure.com/#/signIn?accountIdentifier=XXXXXXXXXX (replace XXXXXXXXXX with your CloudEndure Account Identifier.)
This link will immediately redirect you to the login screen of your Identity Provider. After logging in with your Identity Provider, you will be automatically redirected into the CloudEndure User Console as a signed in user.
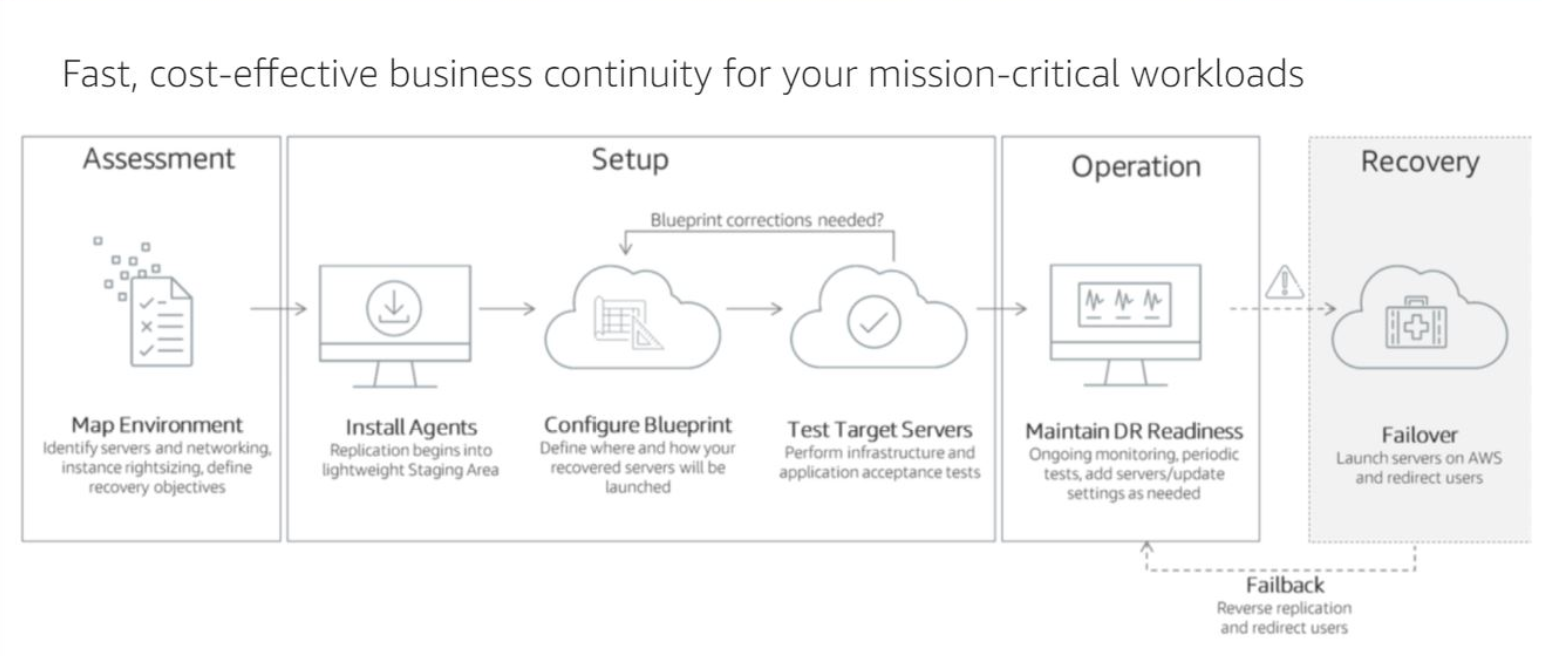
3.3 The Disaster Recovery Process
Disaster Recovery Life Cycle
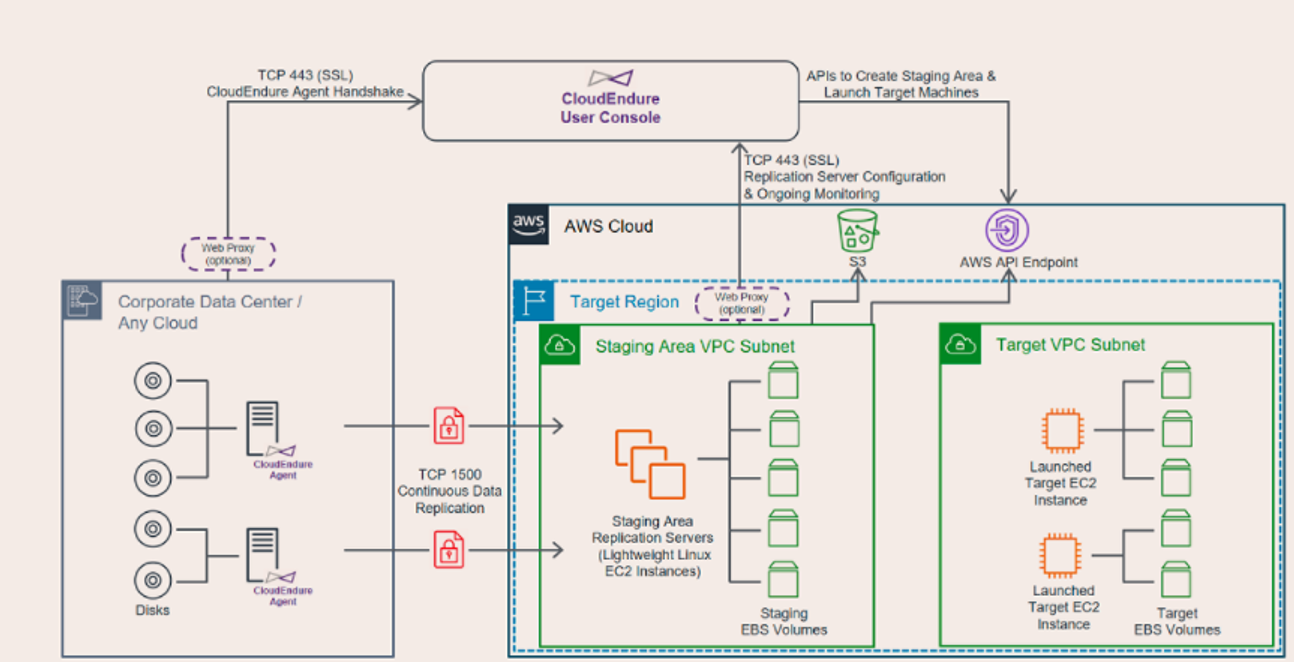
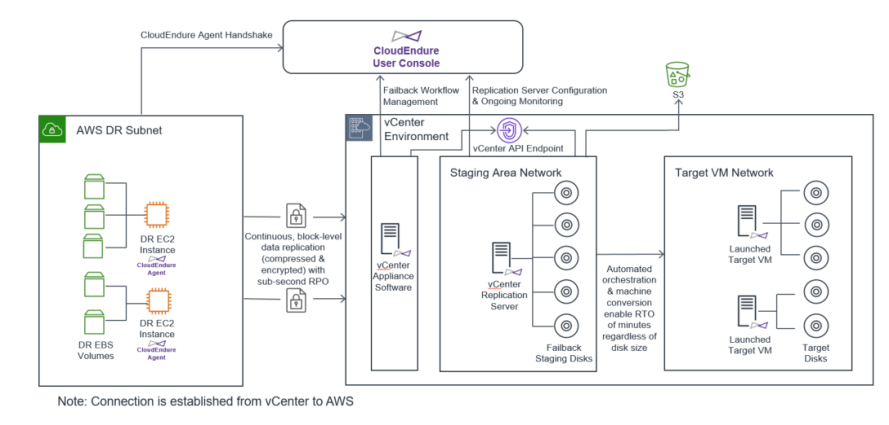
Network Architecture
3.3.1 Install the Cloud Endure Agent on the source machine
Before installing Agent, need to edit the Replication settings in CE Console.
The REPLICATION SETTINGS page enables you to define your Source and Target environments, and the default Replication Servers in the Staging Area of the Target infrastructure.
- After entering your AWS credentials in the Cloud Endure User Console, navigate to Setup & Info > REPLICATION SETTINGS.
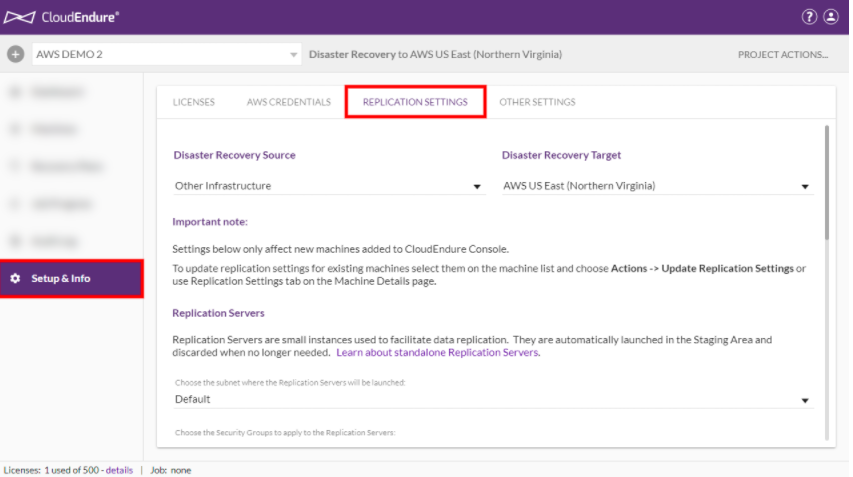
- Next, you will need to define your Source and Target infrastructures and regions.
- After selecting your Source and Target infrastructures and regions, you will need to define your default Replication Servers.
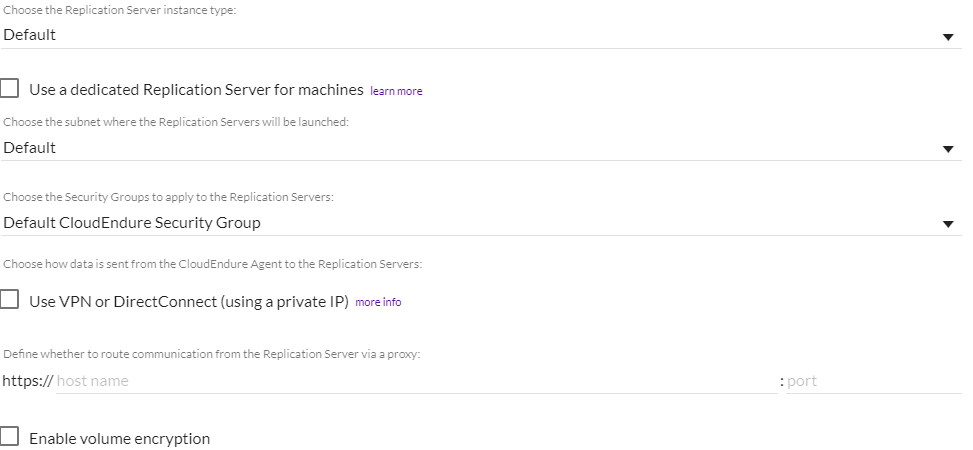
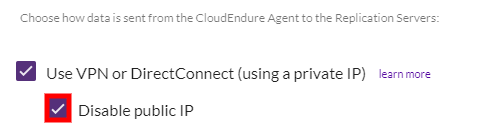
- When the Use VPN… box is checked, you will have the option to disable the use of Public IPs. Public IPs are enabled by default.
- Check the box to the left of Disable Public IP to disable the Public IP.
- If you will be connecting to CloudEndure via a proxy server, you will need to define its URL and Port number.
- Enter your proxy URL under the Define whether to route communication from the Replication Server via a proxy: field after the https://. Enter the port in the port field

-
Once you have set all of your settings, click the SAVE REPLICATION SETTINGS button at the bottom of the page.

- The Agent is installed using an Agent Installer file, which can be downloaded from the Cloud Endure User Console. There are two Agent Installer files - one for Source machines that run all supported Windows OS, and one for machines that run all supported Linux OS.
- The standard installation procedure is simple and quick, and does not require a reboot or any interruption to the applications that are running on the Source machine. After you download and run the Agent Installer file, you are prompted to enter your CloudEndure Installation Token, and to select the disks you want to replicate.
- When selecting disks for replication, you should be aware that the Agent replicates whole disks. Therefore, if you choose to replicate a partition, its entire disk will be replicated, including all the other partitions of this disk. In addition, the root disk of the Source machine is always replicated, whether you select it or not, since it is required for the launch of the Target machine.
- After you make your selection, the installation starts. By default, when the installation is completed successfully, the replication of the Source machines starts automatically, and you can monitor it through the CloudEndure User Console.
- In addition to the standard installation procedure, CloudEndure provides you with additional installation options, which enable you to customize the installation to your network and corporate needs. These installation options include, among others: using command line arguments, installing the Agent without automatically starting replication, and performing a silent installation.
3.3.2 Configure the Target machine Blueprint for each machine.
- The Target machine Blueprint is a set of instructions on how to launch a Target machine for the selected Source machine. The Blueprint settings will serve as the base settings for the creation of the Target machine.
- You can change the Blueprint after the Target machine has been launched. For the new Blueprint setting to take effect, you will need to launch a new Target machine.
- Select the BLUEPRINT tab from the right-hand top navigation menu.
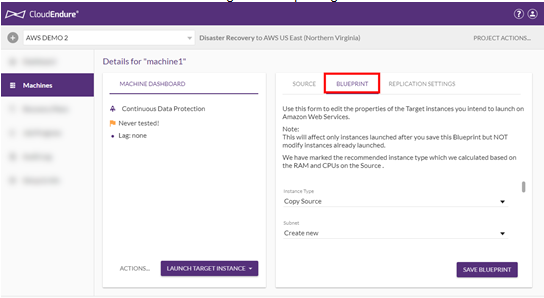
- You can configure an individual machine’s Blueprint by editing the fields in the BLUEPRINT tab. Settings differ by platform. The following fields are available: 1) Machine Type – Select the type of Target machine from the dropdown menu. Make sure to select the machine type that matches the requirements of the application. 1) Launch Type - Select whether you would like to launch the machine on demand, as a dedicated instance, or as a dedicated host. 1) If you select Dedicated host then you will need to select the dedicated host on which this machine should be launched from the list. 1) Subnet - You can select an existing Subnet or create a new subnet. 1) Security groups – Security Groups are connected to subnets. You can change the default Security Group only if you selected an existing subnet (and NOT the Create New option). Therefore, if you want to configure the Security Groups value, it is recommended to set in advance its subnet, so the subnet will already appear on the Subnet drop-down list. 1) Private IP – Each machine that is launched in the cloud will be allocated a Private IP. By default, a new Private IP is created. You can also set a custom Private IP.
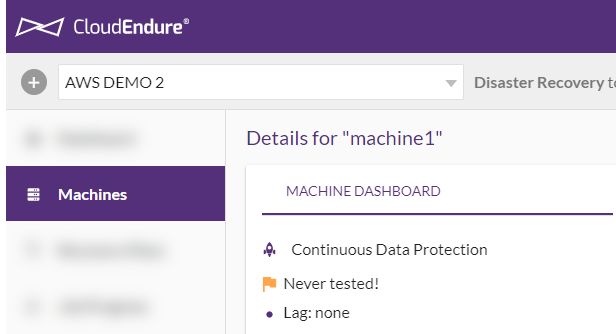
3.3.3 Wait until all machines enter Continuous Data Protection.
Once communication is established between the Agent and the Replication Server, Data Replication begins. The following are the Data Replication steps:
1) Replication Initiation/Initiating Data Replication 1) Initial Sync – in this stage, the progress bar will appear. The block replication of the content of the Source machine will begin, and the content will be copied to the Staging Area. (Recovery Points are created so it will be possible to continue the replication from the last point in case of a disconnect.) 1) Finalizing Initial Synchronization - once the Initial Sync reaches 100%, meaning, the data on the Source and the data on the Target totally match and are in a complete synchronization, another state appears - Finalizing Initial Sync. When reaching 100% for the first time, the machine will still not be launchable until (the Finalizing Initial Sync step consists of two sub-stages): 1) Flushing Backlog – the stage appears when new data was written to the Source machine during the initial replication. This new data is considered as a Backlog. While all the data that exists on the Source when the replication started was replicated, the new data still needs to be replicated. A Backlog does not always exit after the initial replication. It depends on whether new data was written to the Source machine or not. 1) Creating first launchable snapshot – A launchable Recovery Point is created when the Agent informs the CloudEndure Service Manager that it has sent all the content of the Source machine to the Replication Server. This process may take some time.
Once these steps are completed, the machine will be launchable and will show Continuous Data Protection (Disaster Recovery) or Continuous Data Replication (Migration) in its MACHINE
**3.3.4 Test the Failover by creating one or more Target machines.
This will create Target machines for the selected Source machines based on machine and network properties you defined in the Blueprint section for each. The Test does not stop replication.
1) Before you prepare your Source machines for recovery into the Target infrastructure, you should test your CloudEndure Disaster Recovery solution. The Test Mode action launches and runs a Target machine in the Target infrastructure for the Source machine you selected for testing. You can test a Failover by selecting the relevant machines and clicking the Test Mode action.

1) To test a Failover of one or more machines into your Target cloud region of choice, make sure that all the required machines’ status shows a purple launch icon in the Status column. This will create Target machines for the selected Source machines based on machine and network properties you defined in the Blueprint section. 1) Important! The Test action will delete previously launched Target machines! 1) Important! You should run a Test prior to launching a machine in Recovery Mode. After testing either SSH (Linux) or RDP (Windows) into your machine to ensure that everything is working correctly. 1) Note: Windows Source machines need to have at least 2 GB of free space to successfully launch a Target machine. 1) If your Target infrastructure is an extension of your Source, it is recommended that you isolate the Target subnet to ensure that the test Target machines will not affect your original workloads. Do not forget to remove the isolation (or select a different subnet in the Blueprint page) before performing an actual Failover. 1) After the Target machines are created, allow them time to boot.
3.3.5 Initiate a Failover.
1) Before you start the Failover, open the User Console > Machines page. There, verify that the Source machine you want to Failover has the following status indications under each column.
- DATA REPLICATION PROGRESS - Continuous Data Protection
- STATUS –
 Target machine can be launched
 -
DISASTER RECOVERY LIFECYCLE – Tested Recently

1) Check the box to the left each machine you want to Failover and click the Recovery Mode option under the LAUNCH X TARGET MACHINES button.
 1) A confirmation message will appear. Click NEXT to launch the Recovery machine.
1) Choose the Recovery Point for the Target machine in Recovery Mode. This will indicate which Recovery Point the system will use when launching new Target machines for the Failover. You can either choose the Latest Recovery Point, or a previous Recovery Point from the list.
1) After choosing your Recovery Point, click CONTINUE WITH LAUNCH.
1) Most infrastructures allow the following Recovery Point schedules:
1) A confirmation message will appear. Click NEXT to launch the Recovery machine.
1) Choose the Recovery Point for the Target machine in Recovery Mode. This will indicate which Recovery Point the system will use when launching new Target machines for the Failover. You can either choose the Latest Recovery Point, or a previous Recovery Point from the list.
1) After choosing your Recovery Point, click CONTINUE WITH LAUNCH.
1) Most infrastructures allow the following Recovery Point schedules:
- ` ` every 10 minutes in the past hour
- ` ` every 1 hour in the past 24 hours
-
` ` every 1 day in the past 30 days 1) vCenter only allows you a single Recovery Point every 1 day in the past 25 days. 1) A message will appear on the upper right corner of the CloudEndure User Console, informing you that the Failover has started and that a Target machine is being launched for the selected Source machine.
 1) Once the Failover is completed, on the DISASTER RECOVERY LIFECYCLE column, the status will change to Failed over The CloudEndure Console assumes that you have completed the Failover process by this point.
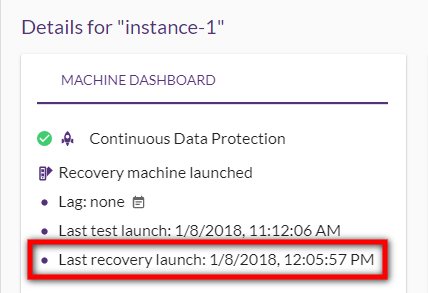
To view additional information on the test, click the Source machine. The Machine Dashboard page will appear, displaying the date of the Failover (last recovery launch.)
3.3.6 Failing Over specific machines
To Failover specific machines, you will need to create a new Project and configure it identically to your original DR Project (same Target region, license, credentials and Replication Settings.) Once you have the Project ready:
-
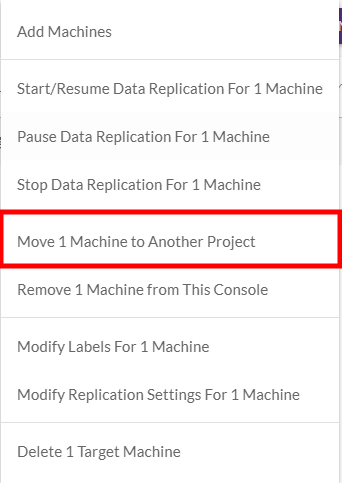
Check the box to the left of the specific machines you want to Failover in the original Project and move them to the newly created Project using the Move X Machines to Another Project option within the Machine Actions menu.
-
Once all the machines have been moved, switch to the newly created Project and repeat the steps in the above Performing the Failover section.
Note: If you were unable to move the machines, then the Project configurations are most likely not identical. Contact Support for additional help.
Note: If you have already launched a Target machine for the machine you are moving, then you do not need to launch a new Target machine after moving the machine to a new Project.
3.3.7 Performing a Failback with CloudEndure
In the event of planned or unplanned downtime, begin the Failover process by using the CloudEndure User Console to launch recovery machines in your Disaster Recovery Target infrastructure.
Note: CloudEndure performs most Failover and Failback related operations other than the actual redirection of traffic from the primary site to the Disaster Recovery site.
The mechanism for preparing for Failback differs based on your original Source and Target infrastructure, as defined in the Replication Settings of your Project.
The following instructions illustrate how to perform a Failback with the aid of CloudEndure for non-cloud and other cloud infrastructures.

AWS to AWS Failback: -

- In the event of planned or unplanned downtime, begin the Failover process by using the CloudEndure User Console to launch recovery machines in your Disaster Recovery Target infrastructure.
- The mechanism for preparing for Failback differs based on your original Source and Target infrastructure, as defined in the Replication Settings of your Project.
- The following instructions illustrate how to perform a Failback with the aid of CloudEndure for non-cloud and other cloud infrastructures.
- After performing a successful Failover, you will want to Failback your machines. CloudEndure allows you to prepare for Failback by reversing the direction of Data Replication from the Target machine back to the Source machine. The CloudEndure User Console will then treat the currently launched Target machines as Source machines and data will flow from your selected Target infrastructure back to your original Source infrastructure.
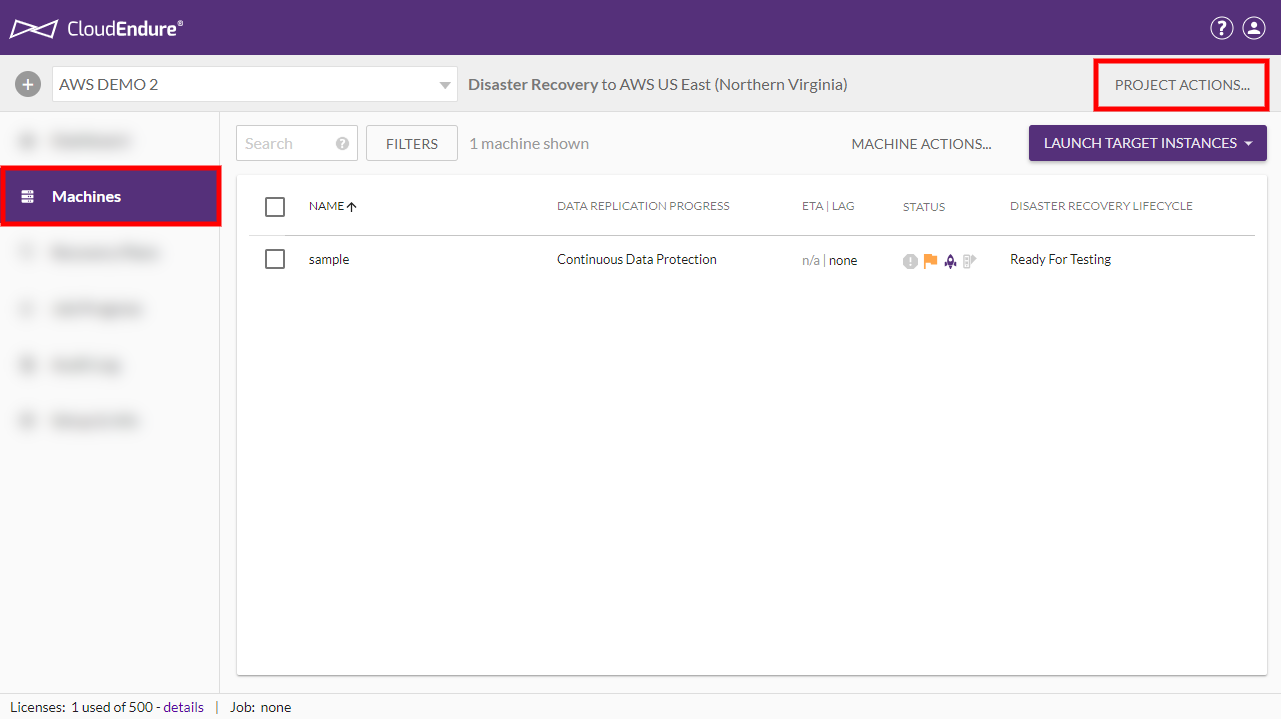
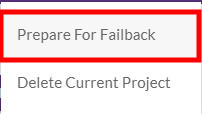
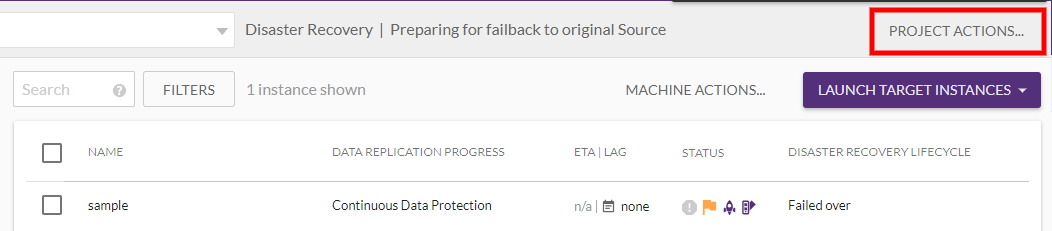
- Click on the PROJECT ACTIONS menu and select Prepare for Failback
- Click CONTINUE on the Prepare for Failback prompt.
-
Once the action is performed the Project will display Preparing for failback to original Source next to the CloudEndure Disaster Recovery Project type and the machines will display Initiating Data Replication under the DATA REPLICATION PROGRESS column. The direction of Data Replication will be reversed and your machines will be failed back from your Target back to your Source

-
The machines will undergo the entire initiation process until they reach Continuous Data Protection status under the DATA REPLICATION PROGRESS column.

-
vCenter as a Source infrastructure only - You must edit the Failback Settings of any Project prior to performing the Failback. These settings will be used as a template for the Replication Settings of each of your machines when you perform a Failback.
AWS to vCenter Failback
-
To change the Failback settings, navigate to the Setup & Info tab on the left-hand navigation menu and click on FAILBACK SETTINGS.
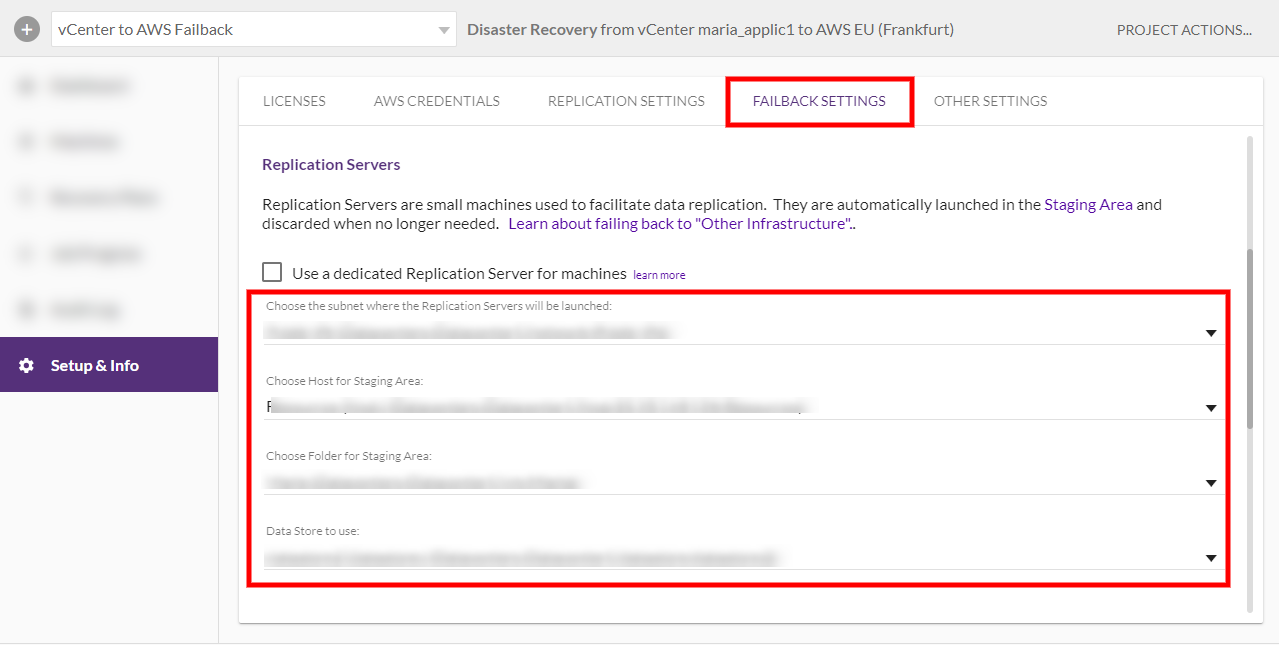
- Edit the settings as desired and then click SAVE FAILBACK SETTINGS on the bottom right of the page.
-
After performing the Prepare for Failback action, you can edit the Failback Settings and Back to Normal settings of your individual machines.
Performing a Failback Using the CloudEndure Failback Client - Non cloud or other cloud source to an aws Target
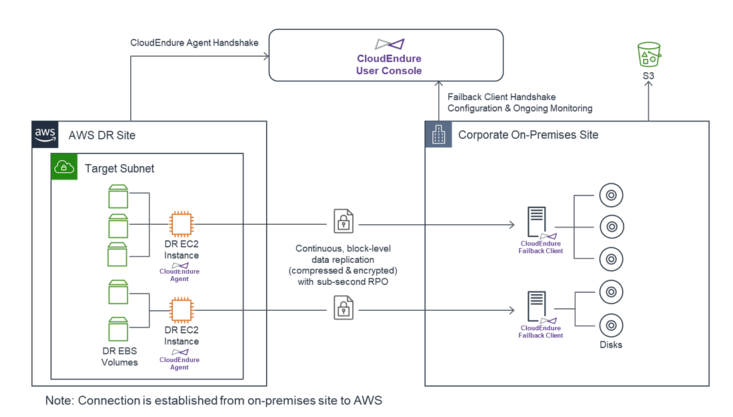
- You can perform the Prepare for Failback action by following these steps:
- Click on the PROJECT ACTIONS menu and select Prepare for Failback
- Click CONTINUE on the Prepare for Failback prompt
- Once the action is performed the Project will display Preparing for failback to original Source next to the CloudEndure Disaster Recovery Project type. The machines in the Machine List View will display Waiting for boot from Failback Client under the DATA REPLICATION PROGRESS column. The Machine Details View for the machines being failed back will also indicate that it’s Waiting for boot from the Failback Client. The Machine Details View will show all of the steps that the Failback Client will undergo during the failback process. Use this view to monitor the progress of the failback and to troubleshoot any issues.
- Download the Failback Client, using the link from the Replication Settings section in the CloudEndure User Console under Setup & Info. You can access the link by clicking on Learn more about failing back to “Other Infrastructure” and then clicking download from here on the Failing Back to an Unidentified Cloud / Other Infrastructure dialog. The file will be downloaded automatically.
- To initiate replication of a Source machine, the Target machine needs to be booted into the CloudEndure Failback Client Image (failback_livecd.iso)
- The Failback Client interface will launch and connect to the DHCP client. Upon connection, you will be prompted for your CloudEndure Installation Token. Input your installation token into the Failback Client.
- The Failback Client will attempt to automatically detect your instance. If the Failback Client is unable to automatically detect your instance, then it will ask you to manually map the instance by selecting the instance from a list of available instances. If the Failback Client is unable to fetch a list of available instances, it will ask you to enter the full instance ID manually. You can follow the progress of the Failback Client in the Machine Details View in the CloudEndure Console. Once you have entered your installation token, authentication has been complete, and the instance has been detected the Authenticate Failback Client and the Determine the EC2 instance to fail back from steps will be marked as complete in the Machine Details View.
- The Failback Client will attempt to automatically map the volumes on your machine. If successful, then the Failback Client will indicate that the volumes were mapped successfully and show the exact volume mapping that will be used. If the Failback Client fails to map the volumes automatically, then you will be requested to map the volumes manually. Enter a local block device (e.g. /dev/sdg) to replicate from the remote block device or use the EXCLUDE command to exclude a device. The Failback Client will indicate if the manual mapping is invalid and will state a reason, such as volume size mismatches, a lack of a root-level block volume, non-existant volume, or a volume that cannot be read. Once the volumes have been mapped, the Complete Volume Mapping step will be marked as complete in the Machine Details View.
-
The Failback Client will attempt to download the CloudEndure Replication Software. If the Failback Client fails to download the CloudEndure Replication Software, it will retry to download the software three more times. If the download still fails, then an error message will be displayed. The Failback Client will indicate exactly which software package it failed to download.
The download may fail due to various reasons, including lack of connectivity to s3, a network disconnect, or a lack of connectivity to the CloudEndure Service Manager. Ensure that you have the correct connectivity settings configured and then rerun the Failback Client. Once the CloudEndure Replication Software has been downloaded, the Download the CloudEndure Replication Software to the Failback Client step will be marked as complete in the Machine Details View.
- The Failback Client will attempt to configure the CloudEndure Replication Software. If the Failback Client fails to configure the CloudEndure Replication Software, then that means that the software was not installed properly. Rerun the Failback Client (by rebooting the machine with the Failback Client ISO). Once the CloudEndure Replication Software is configured, the Configure CloudEndure Replication Software step will be marked as complete in the Machine Details View.
- The Failback Client will attempt to verify EC2 instance connectivity to the CloudEndure Service Manager. If the initial connection fails, then the Failback Client will retry the connection. If the Failback Client isn’t able to verify connectivity after retrying, then you will need to ensure that the Security Group attached to the EC2 instance allows 443 outbound connectivity and ensure that you have the correct connectivity settings configured . The Establish communication between the EC2 instance and the CloudEndure Service Manager step in the Machine Details View in the CloudEndure Console will indicate that this step is stuck until connectivity is verified. Once connectivity is verified, the Establish communication between the EC2 instance and the CloudEndure Service Manager step will be marked as complete in the Machine Details View.
- The Failback Client will attempt to pair with the CloudEndure Agent running on the EC2 instance. If the Failback Client failed to pair with the CloudEndure Agent running on the EC2 instance, then you should contact Support. Once the Failback Client is paired with the CloudEndure Agent running on the EC2 instance, the Pair the CloudEndure Agent with the CloudEndure Replication Software step will be marked as complete in the Machine Details View.
- Finally, the Failback Client will attempt to establish a connection with the CloudEndure Agent running on your EC2 instance over port 1500. Once connection is established, replication will begin immediately. The Failback Client will continuously attempt to connect until connectivity is established. If the Failback Client fails to connect, then you will need to ensure that the Security Group attached to the EC2 instance allows 1500 inbound connectivity and ensure that you have the correct connectivity settings configured . The Establish communication between the CloudEndure Agent and the CloudEndure Replication Software step in the Machine Details View in the CloudEndure Console will indicate that this step is stuck until connectivity is established. Once a connection is established, replication will begin immediately. You will most likely not see the Establish communication between the CloudEndure Agent and the CloudEndure Replication Software marked as complete in the Machine Details View. Instead, you will see Initial Data Replication starting, on both the Machine Details View and the main Machine List View.
- When initial replication is completed, the User Console will indicate that replication is in Continuous Data Protection mode. You will now need to launch new Target machines for your failed back machines. Check the box to the left of each machine name, click the LAUNCH TARGET MACHINES menu, and select Recovery Mode.
- Click NEXT on the Launch Target Instance dialog.
- Select the Latest Recovery Point and click CONTINUE WITH LAUNCH.
- When the Test or the Recovery are finished, the Failback Client will indicate that the failback has been finished and that the machine will be rebooted. The Target machine will eject the Failback Client and reboot into the new operating system.
3.3.8 Failing Back specific machines
In certain cases, you may want to perform a failback for a single machine (or various - but not all - machines) in a Project with multiple machines (AWS Source or a vCenter Source to an AWS Target.)
This can be achieved by moving the desired machines into a separate Project and performing the failback as discussed in the Performing a Failback Using the CloudEndure Console section above.
You can move a Source machine from one Project to another. When a Source machine is moved to another Project, the replication of its data continues without major interruptions (except for a small backlog). A backlog occurs, but no re-scan or sync is performed. The Blueprint of the machine is maintained without change.
In order to move a Source machine from one Project to another, the two Projects need to match. The criteria for matching Projects are as follows:
- CloudEndure Account - to match, the Projects must belong to the same CloudEndure Account.
- Cloud account – at times, there are several accounts on the same AWS cloud. To match, the Projects must belong to the same cloud account, both on the Source and the Target infrastructures.
- Solution type – either Migration or Disaster Recovery. To match, the Projects must belong to the same solution type.
- Source infrastructure (including region) and Target infrastructure (including region) – to match, the Projects must have the same Source and Target infrastructures and regions
- License Package – to match, the same License Package must be applied to both Projects.
You cannot move a Source machine that is in the middle of a Job (launching a Test or a Recovery machine, deleting Target machines), or if the Account is currently being upgraded. If you want to move a Source machine to a Project that does not match its existing project, do the following:
- Uninstall the Agent from the machines
- Open the new Project and install the Agent of that Project on the machines.
Moving the Machines
-
From the Project list, select the Project that includes the Source machine you want to move.
-
Open the Machines page, and check the box next to the name of the Source machines you want to move.
Note: You can move multiple machines at once by selecting them on the Machines page.
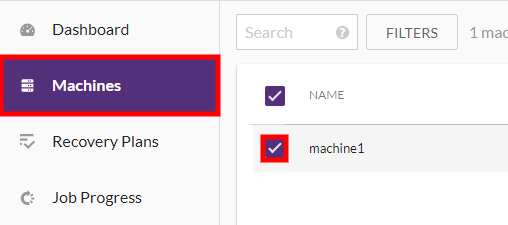
-
Click the MACHINE ACTIONS button, and select the Move X Machine to Another Project option.
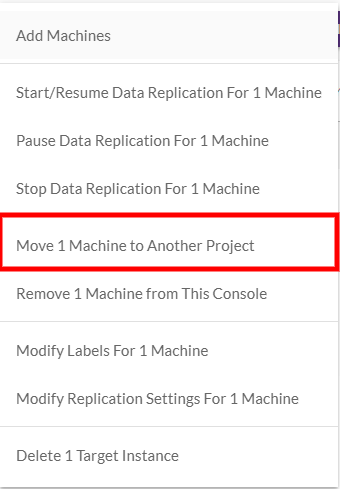
-
The Move machine to another Project dialog box will appear. Open the Move drop-down list and select the destination Project to which the Source machine will move. Click MOVE MACHINES.

Note: Projects that are not listed do not match the criteria.
-
The selected Source machine will be moved to the destination Project, and it will no longer appear on the Machines page of the original Project. A message will appears on the upper right corner, informing you that X machine moved.

When you select the destination Project from the Project list, the moved machine will appear on its Machines page. From there, continue with the steps in the Performing a Failback Using the CloudEndure Conosle section.
3.3.9 Return to normal operations.
1) Once the Target machines have been launched, click the PROJECT ACTIONS menu and select Return to Normal Operation to reverse the direction of Data Replication back to its normal state (original Source to original Target.)
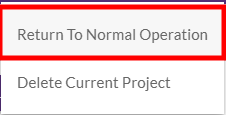
1) Click CONTINUE on the Return to Normal dialog. 1) Your machines will yet again undergo the initiation sequence.

1) Once your machines enter Continuous Data Protection mode, the Failback process has been successfully completed.
3.4 Post Launch Scripts
Important! The information provided in this section is for general guidance only. The information is provided on “AS IS” basis, with no guarantee of completeness, accuracy or timeliness, and without warranty or representations of any kind, expressed or implied. In no event will CloudEndure and/or its subsidiaries and/or their employees or service providers be liable to you or anyone else for any decision made or action taken in reliance on the information provided above or for any direct, indirect, consequential, special or similar damages (including any kind of loss), even if advised of the possibility of such damages. CloudEndure is not responsible for the update, validation or support of scripts.
Note: Post Launch Scripts do not work when the selected Source is an AWS Region.
CloudEndure can run scripts on a Target machine after it’s launched. This is done by creating the following folder on the Source machine and placing the scripts within that folder:
Linux: /boot/post_launch (any files that are marked as executable)
Windows: C:\Program Files (x86)\CloudEndure\post_launch (any .exe, .cmd or .bat files)
Once you put these scripts in the above folders on the Source machine, the folder will be replicated to the Target and be executed once after the target machine boots the first time.
You can use this script to convert a PowerShell command into an EXE file.
**Note:** Post Launch Scripts are ran under the Local Service context.
Clearing Read-Only Disks
The following script may be utilized to clear Target disks that come up as “read-only”. You can learn more about this issue here.
@ECHO OFF
setlocal enableextensions enabledelayedexpansion
SET "cmd=echo list disk | diskpart"
SET /a index = -1
FOR /F "skip=7 usebackq delims=" %%? in (`"%cmd%"`) do (
IF "%%?" NEQ "DISKPART> " IF !index! NEQ -1 (
ECHO select disk !index!>>offreadonlyfile.txt
ECHO attributes disk clear readonly>>offreadonlyfile.txt
ECHO REM online disk>>offreadonlyfile.txt
DISKPART /S offreadonlyfile.txt
DEL offreadonlyfile.txt
)
SET /a index += 1
)
Note: This script it will only clear the readonly flag, and won’t bring the disk online. If you want it to change all disks to online as well, delete the REM from the following line: ECHO REM online disk»offreadonlyfile.txt
Uninstalling VMTools from Windows
The following script can be utilized to uninstall VMTools post migration from Windows. CloudEndure does not recommend doing this for Failed Over Disaster Recovery servers.
This is a powershell script. It needs to be wrapped by a .CMD file, as powershell scripts are not ran automatically by the post_launch.
$regpath = "HKLM:\Software\Microsoft\Windows\CurrentVersion\uninstall"
Get-childItem $regpath | % {
$keypath = $\_.pschildname
$key = Get-Itemproperty $regpath\$keypath
if ($key.DisplayName -match "VMware Tools") {
$VMwareToolsGUID = $keypath
}
MsiExec.exe /x $VMwareToolsGUID /qn /norestart
}